Ping Connect | Videocon
Consent Template Registrations Process
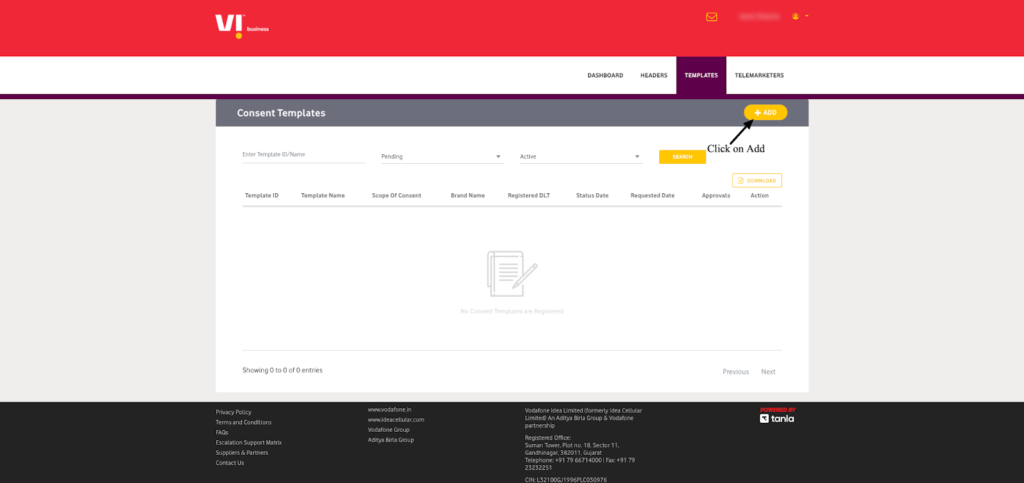
1. Login to your ping connect account and navigate to the CONSENT template option on the left panel.
Please note, that the process of consent is only for those who are using promotional or service explicit templates.
2. Go to >> Create a new consent template
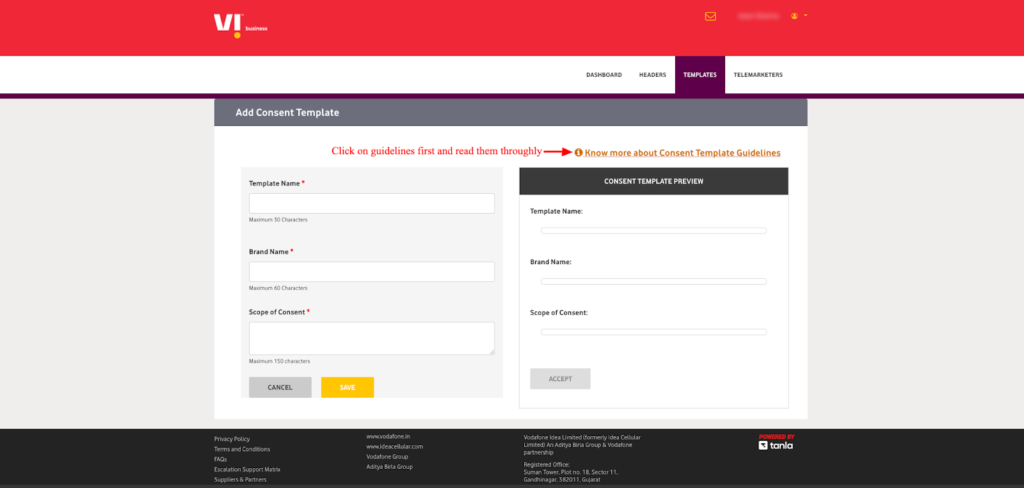
3. Click on the guidelines provided on the link (step 3) once read, fill in the details as asked and ignore the option of uploading for now.
Proceed with OTP requesting and submit the request. Do not forget to add the brand name to your consent template.
Consent templates have a character limit of 150 characters.
VILpower
Consent Template Registrations Process
1. Login to your VILPower account: https://www.vilpower.in/ navigate to Template on the top panel. Please note, that the process of consent is only for those who are using promotional or service explicit templates.
2. Click on Consent Template on the drop-down option >> click on add (top right). Once applied for a consent template, you can see your templates collectively on this window.
3. Read the consent template guidelines before applying for one, fill in the details as asked, and do not forget to add your brand name to your consent template.
Consent templates have a character limit of 150 characters.
TrueConnect JIO
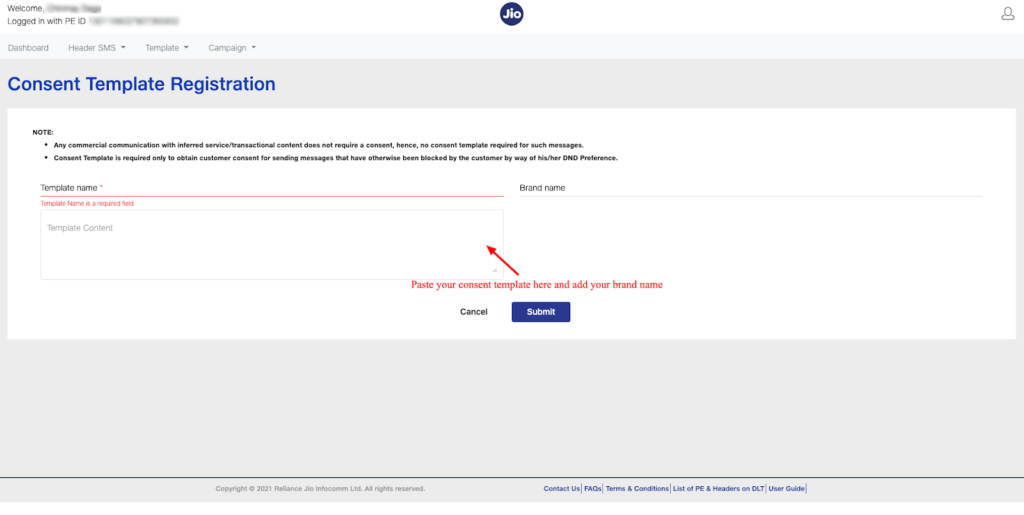
Consent Template Registrations Process1. Login to your JIO account: https://trueconnect.jio.com/navigate to Consent Template on the top panel. Please note, that the process of consent is only for those who are using promotional or service explicit templates.

2. You are now on a consent template registration page, kindly add your Consent template with your Brand name in the template and in the asked field. Once you are sure with the details filled, click on submit.
Consent templates have a character limit of 150 characters.
To send Service Explicit and Promotional SMS on DND-enabled numbers, kindly follow this first process of applying the Consent Template.However, this Consent process is not required for Service Implicit SMS.As of now, just apply for the Consent Template by following the below steps:
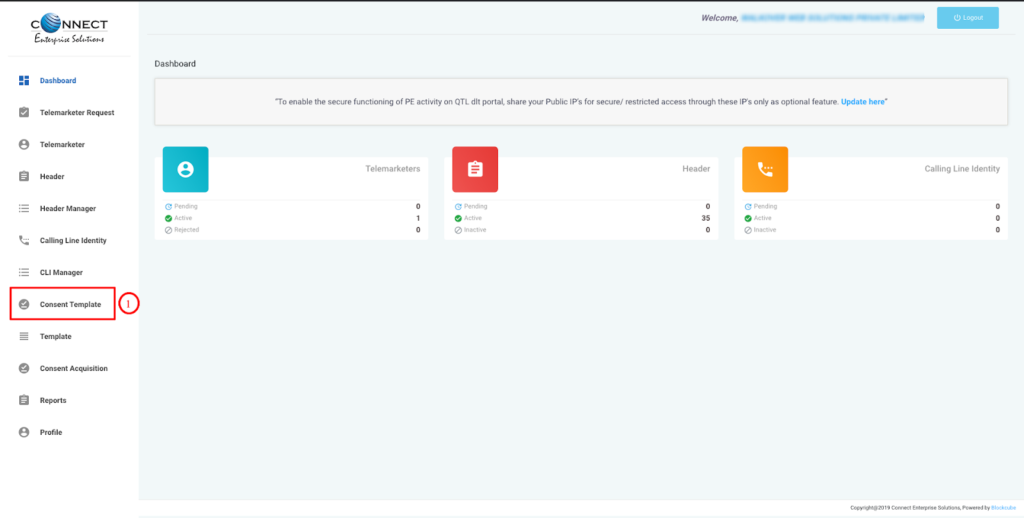
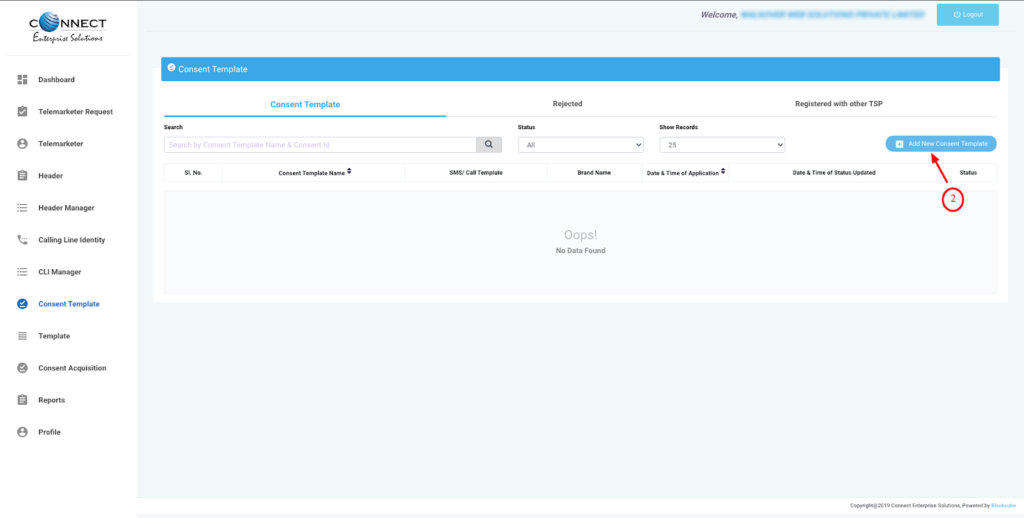
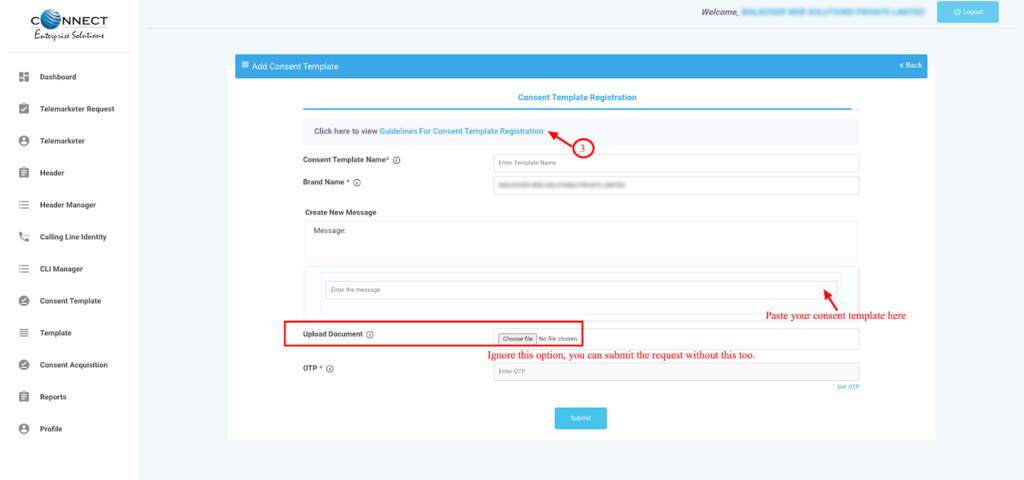
1. Login to your DLT platform, navigate to the CONSENT template option and click on add new.
2. The Consent Template should not contain any variables.
3. Brand/PE/Trade/Legal Name must be there in the Template.
Samples of Consent Template for your reference:
1. “XYZ Communications” [Brand Name] would like to send messages about your account details and best offers to serve you better.
2. “AAA Pvt Ltd” [Brand Name] will send you the information about new offers and events.
3. Dear Customer, we are pleased with your signup with “XYZ Communications”[Brand Name] today. To receive exciting promotions and offers on SMS/call, please submit your consent.
4. Dear Customer, thank you for submitting your requirement on our website today. We will keep you informed on new listings suited to you. Please give your consent for receiving these listings through call/SMS. — AAA Pvt Ltd [Brand Name]
As per DLT platforms, there is a new feature that will help you to send Service Explicit and Promotional SMS to DND-enabled numbers.Kindly note that Service Implicit SMS will continue to be delivered on DND numbers as usual.
Currently, there are some restrictions on sending Service Explicit and Promotional Templates to DND numbers (explained in the table below).However, with this new feature, if your customers have given you their Consent to send SMS, you can upload their mobile number in the DLT Consent Section, then every SMS can be delivered to them.
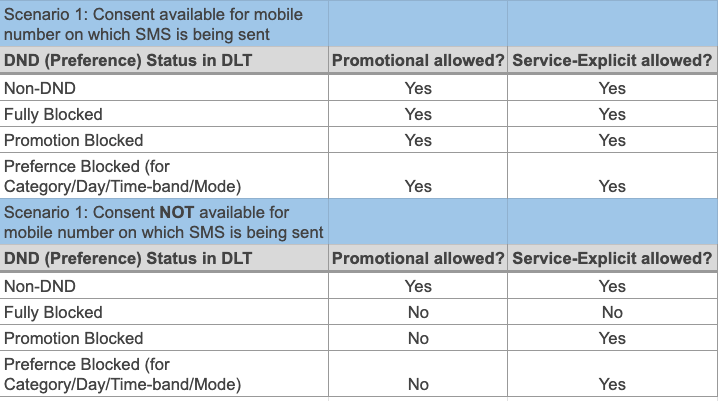
Kindly note that if you do not upload Consent Data, your SMS will keep delivering the way they are delivering today.The process for the DLT Consent Feature is as follows:
Step 1: Apply for Consent Template:https://c2sms.com/faq/dlt-consent-template-registration/
Step 2: Once your consent template is approved, the next step is to upload your consent data. Kindly note the below points before uploading.
a. Select your consent template Id
b. Add consent data as per the sample file shared on the DLT platform (ex: ping connect, Airtel, JIO, etc)
c. Format your data as per their instructions and upload it on the DLT platform, kindly adhere to the file format and size.
d. You cannot upload more than 5 lakh entries in a single file.
e. The date of Consent shouldn’t be older than 6 months from the date of consent upload.
Step 3: Once consent data is uploaded, you need to make the payment to the DLT platform itself.
| Slab (Consent Numbers per file) | Amount per PE ID (INR) |
| Up to 10,000 | 5000 + GST |
| 10,001 to 1,00,000 | 10,000 + GST |
| 1,00,001 – 3,00,000 | 15,000 + GST |
| 3,00,001 – 5,00,000 | 20,000 + GST |
The Consent Upload process for the different DLT platforms:
VILPower: Consent Upload | Vilpower.pdf
TATA: Consent | TATA.pdf
Using the 360 Client Hub, you will be able to manage and track all your WhatsApp Business Account information including activation status updates, namespaces, phone numbers and API Keys.
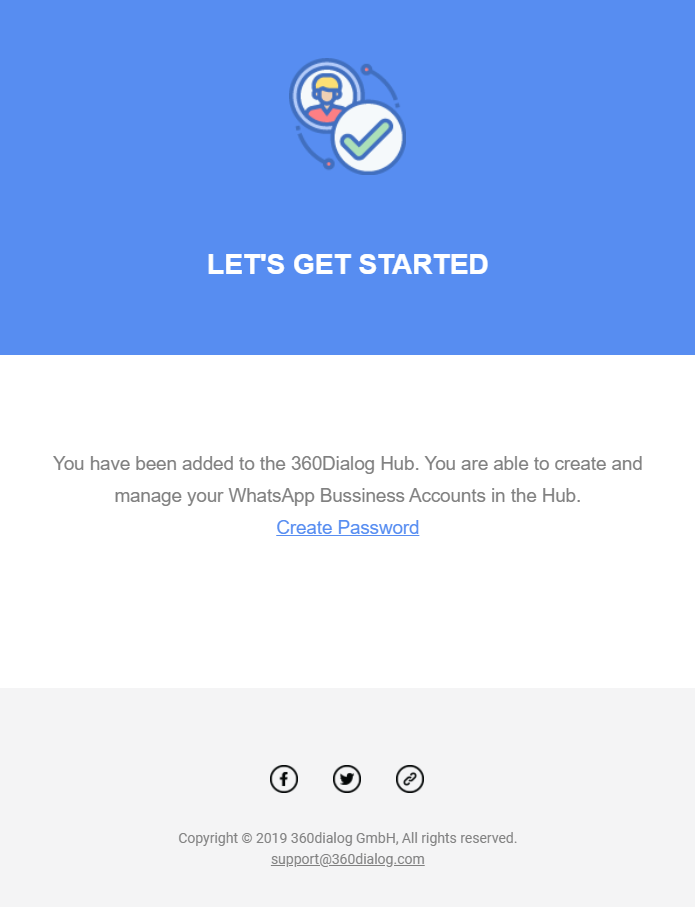
After submitting the necessary information, you will receive an email invite asking you to create a new password for your newly created account. Click on Create Password and follow the instructions.
This is the homescreen of the 360 Client Hub. Here you will be able to track all your WhatsApp Business Account numbers. When you first log into the 360 Client Hub you will see your WhatsApp Account in DRAFT status.
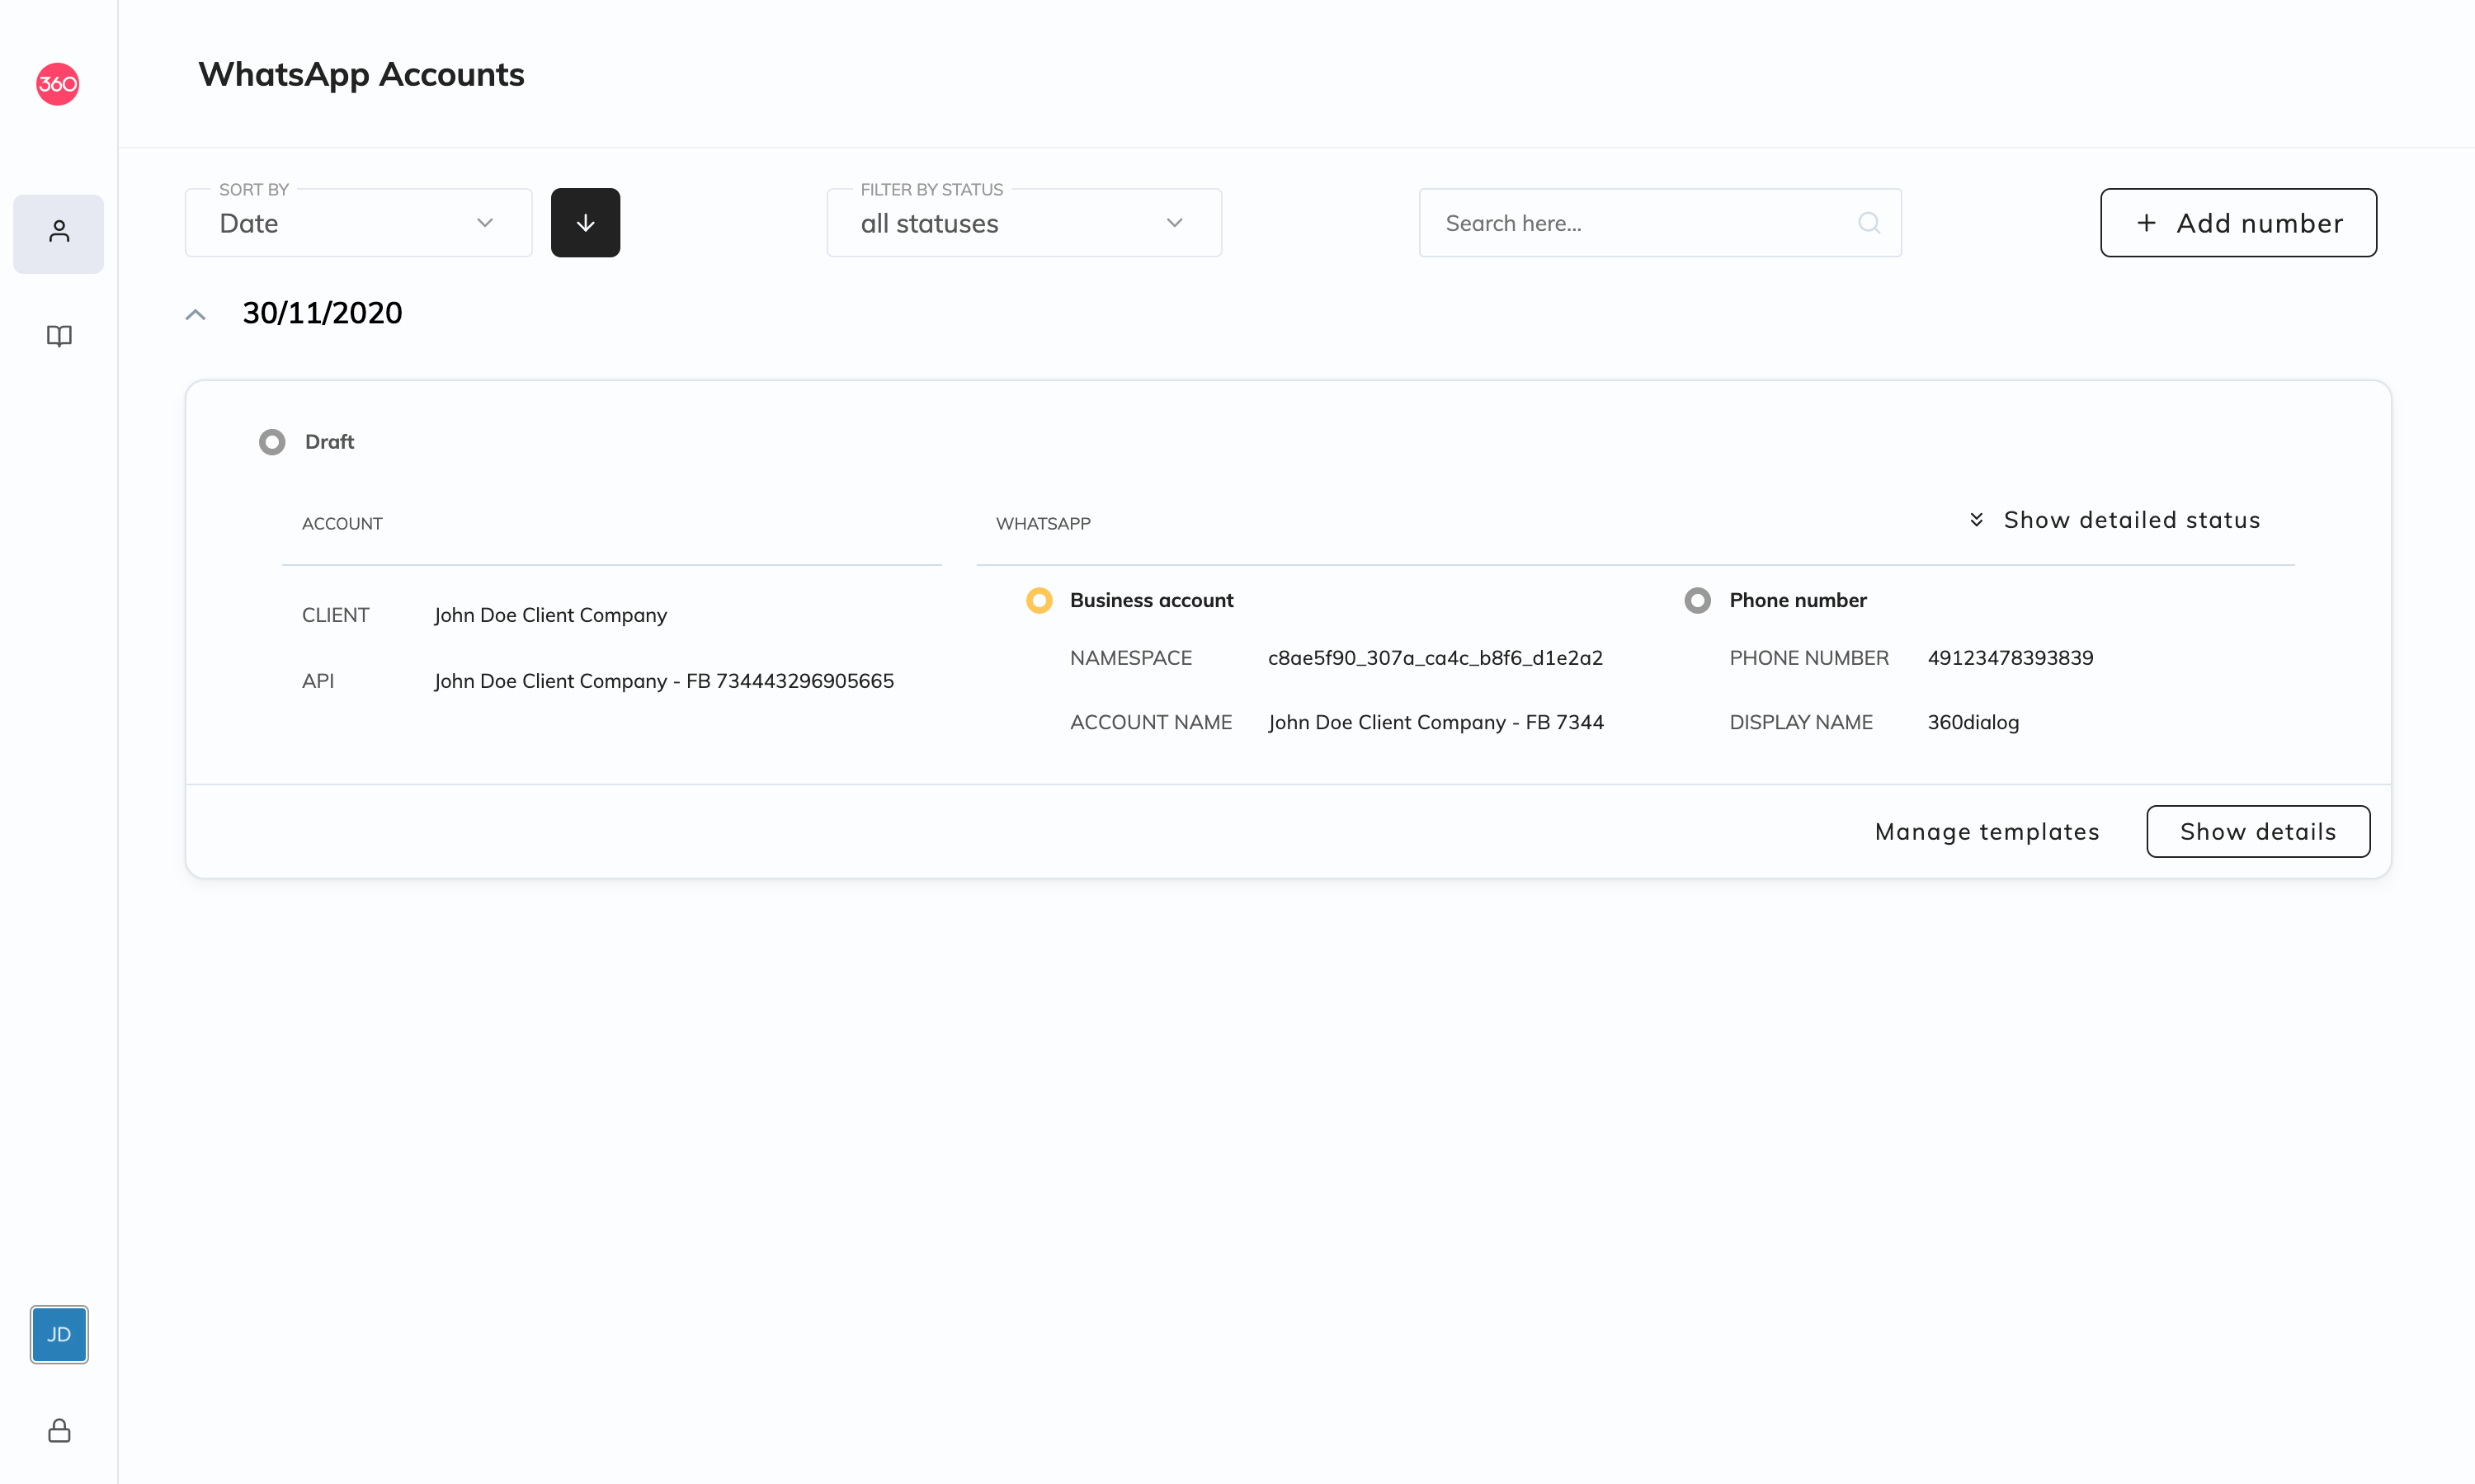
Each number connected to your account can be seen in a folder like this:
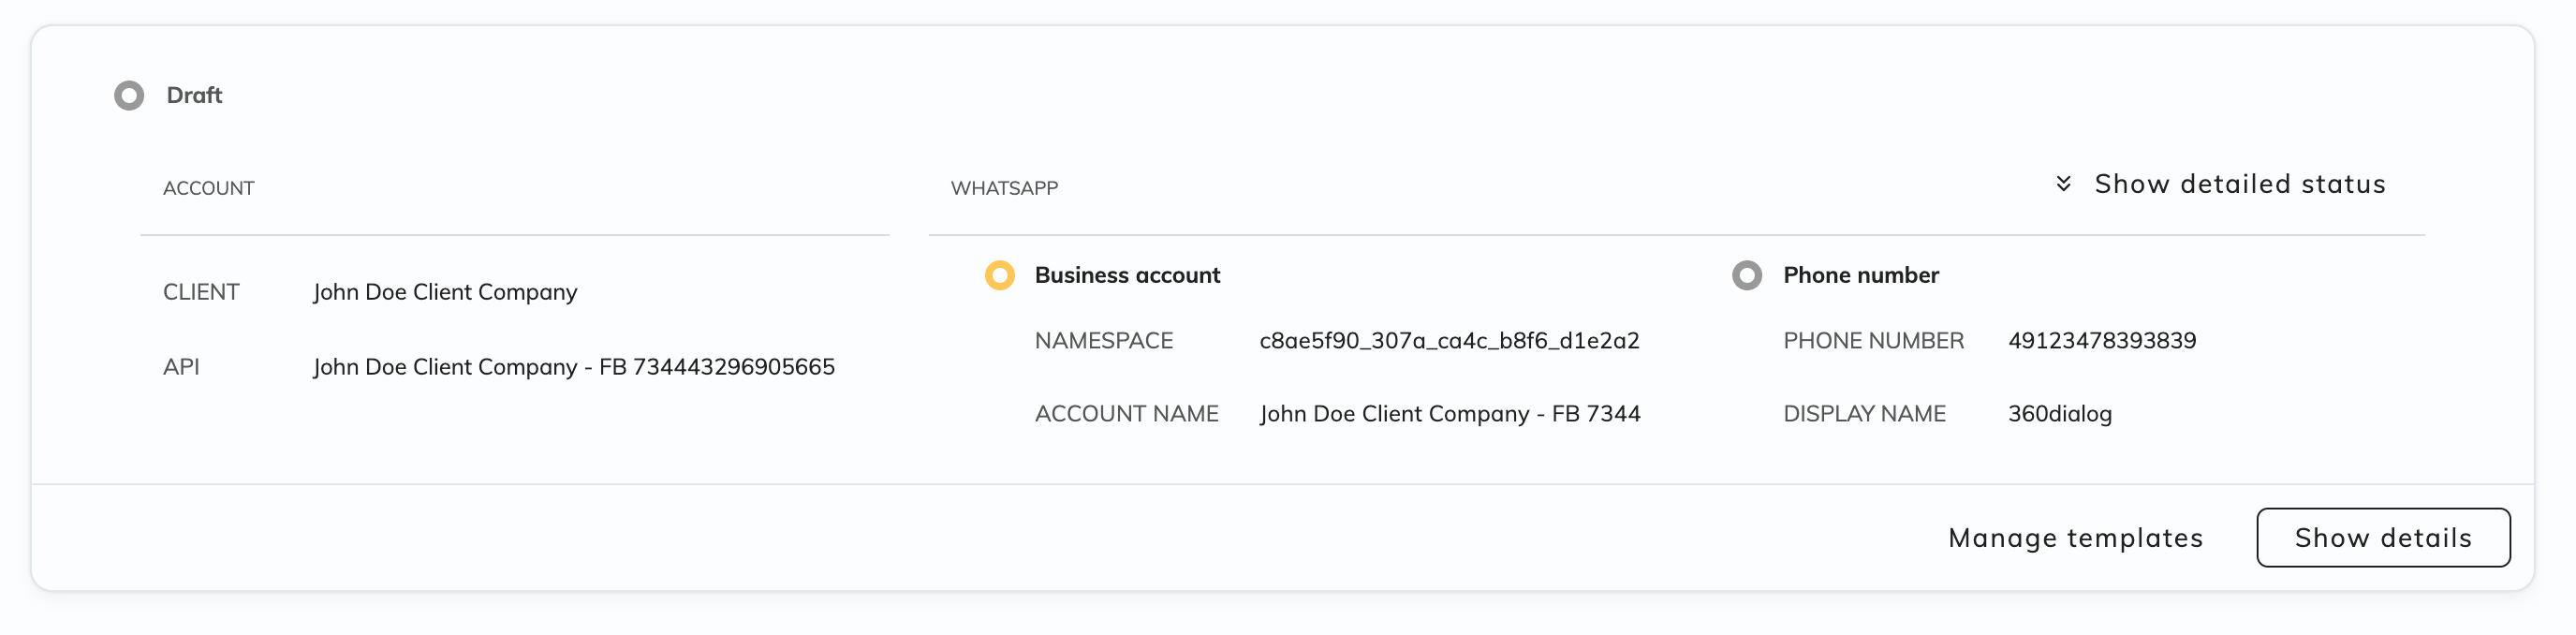
By clicking on show detail status (on the top right corner) you will get an overall view of the complete status of the account:
All the statuses of both the WhatsApp Business Account (WABA) and Phone Number columns (middle and right columns) will turn green when the number is active and running. At this point, the Generate API Key button will become available.

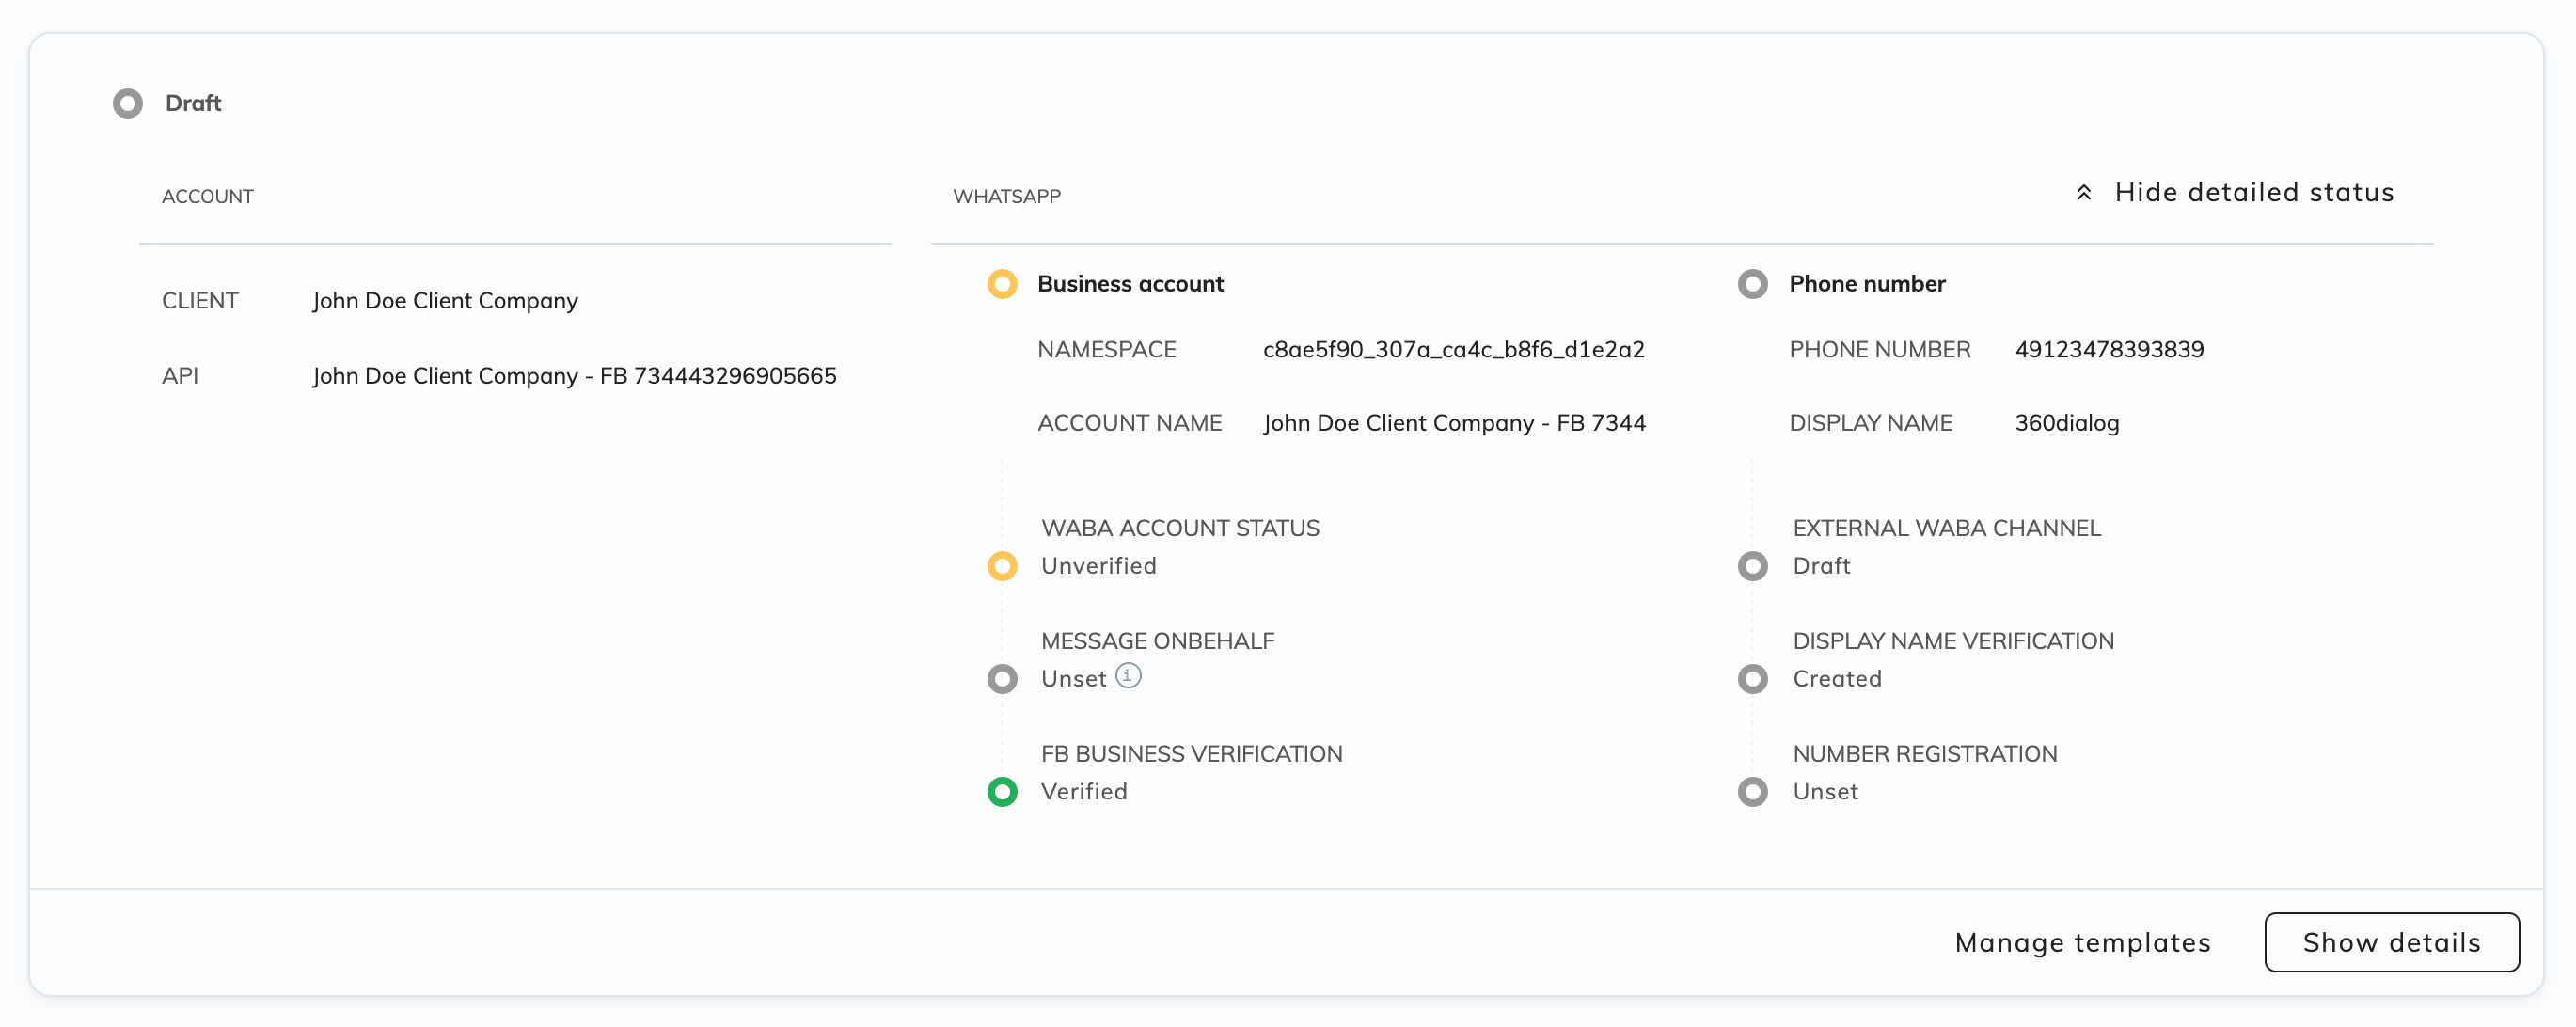
By clicking on Show details you can access and review more information about the account and number like:
Get a Test API key for our Sandbox Environment and try out our WhatsApp Business API.
What you can do in the Sandbox
What you can’t do with the Sandbox
To get a test API-KEY you can either
Send a WhatsApp message from your phone to the phone number 4930609859535 with the content START
or You can use this link: https://wa.me/4930609859535?text=START https://wa.me/4930609859535?text=START
As a response, you will receive your TestAPI-KEY.This API-KEYis associated with your phone WhatsApp number. Now you are able to use the 360dialog WhatsApp API. You can set your own Webhook or send an unlimited number of messages and limited (10) templates.

Compliance with WhatsApp policies and use cases that respect WhatsApp guidelines. WhatsApp requires compliance with their:
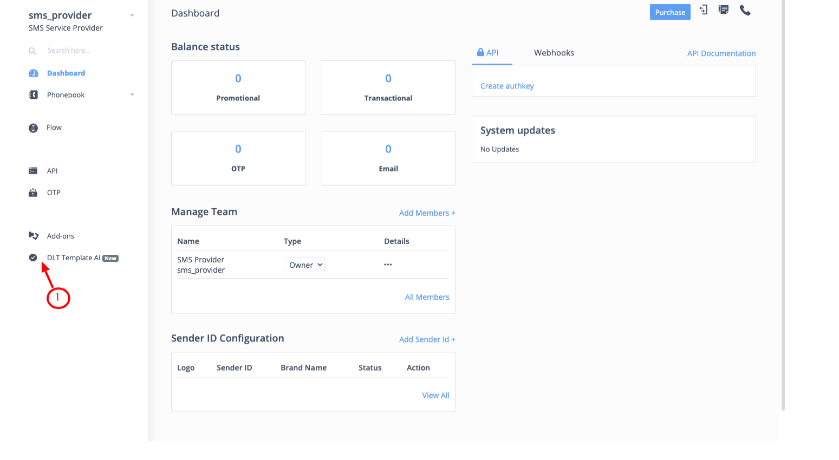
If you are UNABLE to pass DLT Template in the SMS API, you can use this feature. ( Video Doc Click Here )
**If you are using Flow API or OTP V5 API, instead of this feature, check this- https://c2sms.com/faq/changes-and-testing-on-c2sms-panel-for-flow-v5-api/
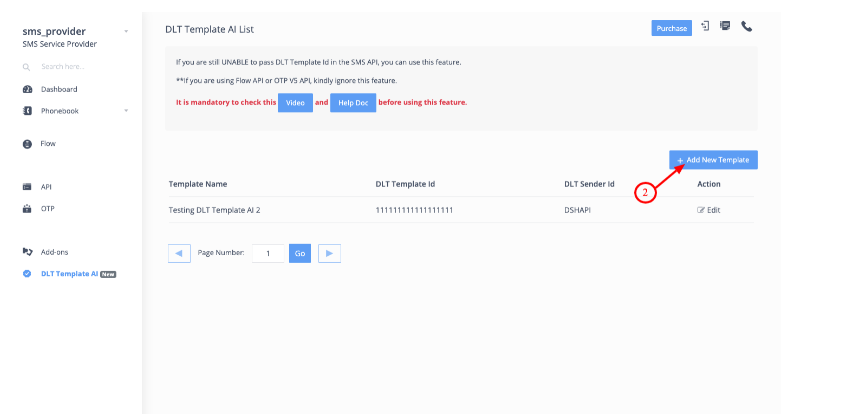
2. You will see a two partition page, kindly follow the below steps first:
3. After copying the API sent SMS content, and DLT approved template, paste it on the left and right side of the page respectively.
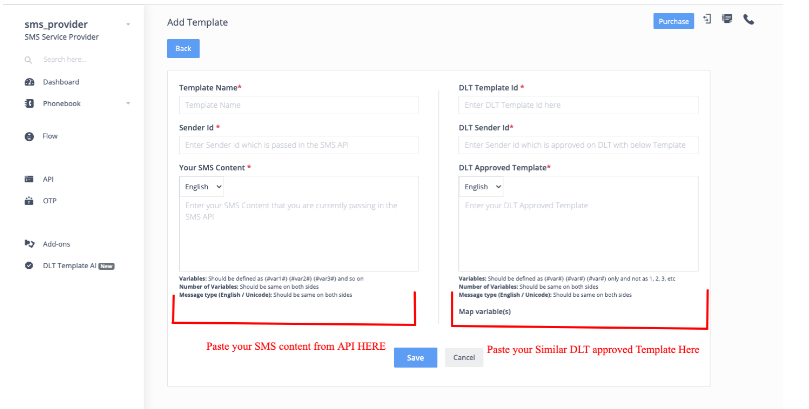
4. Now Map your variable carefully, below are some rules for both the side of the page:
Variables: Should be defined as {#var1#} {#var2#} {#var3#} and so on
Number of Variables: Should be the same on both sides
Message type (English / Unicode): Should be the same on both sides
Variables: Should be defined as {#var#} {#var#} {#var#} only and not as 1, 2, 3, etc
Number of Variables: Should be the same on both sides
Message type (English / Unicode): Should be the same on both sides
5. Once mapped, kindly save the template.
How this functionality works:
Once we’ll receive your left-side content from your API, we will pick the right-side DLT approved template, check for your variables mapping, and submit it to the end operator.
Note- Use this feature ONLY if you are unable to pass DLT Template Id in the SMS API.
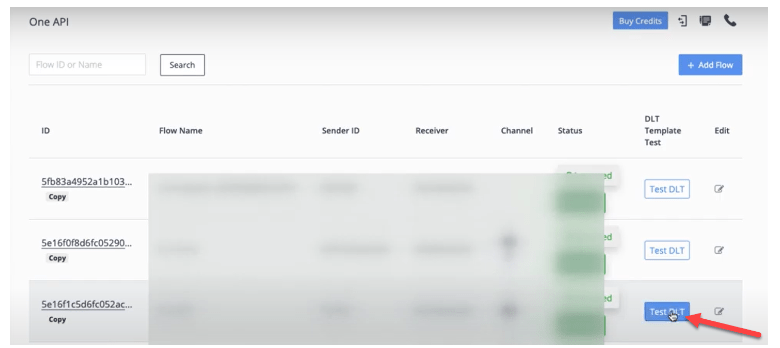
1. Login to the C2SMS panel
2. Go to the FLOW section
3. Click on Add Flow
4. Add flow name
5. Enter approved DLT template ID
6. Add DLT approved Template

7. Changes and Testing on C2SMS
6. Now, check your phone for this SMS; if you have received this SMS, that means that this
Template, Header, and Template Id combination will work in the right way once the DLT
Template is LIVE.
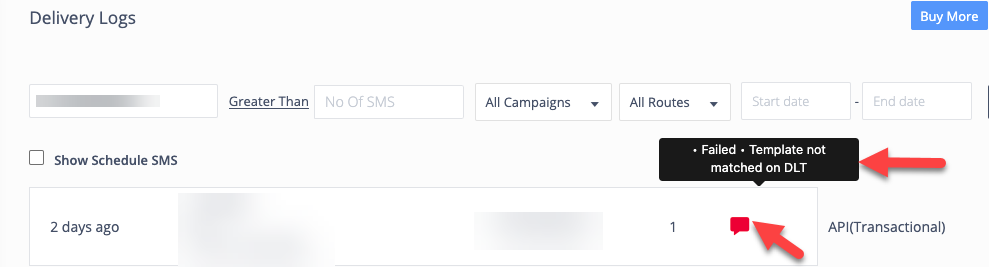
7. If you have not received this SMS, login to the panel, go to the logs section, and search for this
particular number. You will be able to see the exact reason for failure when you bring the cursor
on the red failure sign.
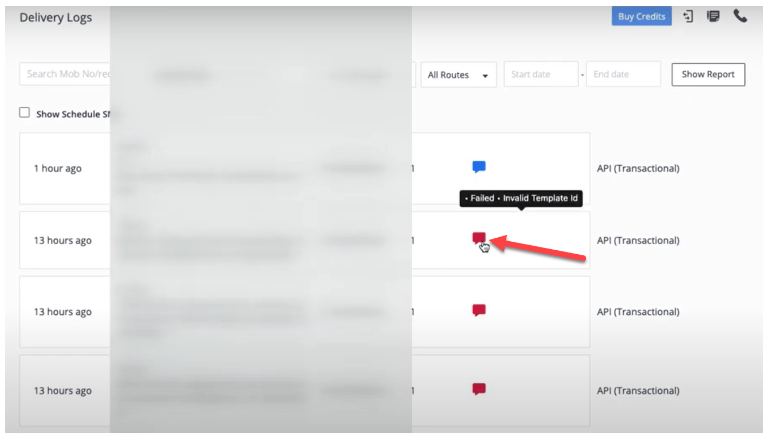
8. Based on the failure reason, correct your mistake and try again.
Changes in C2SMS Send API
You have to pass the DLT approved Template Id as an additional parameter, along with all other parameters as you are passing currently.
Additional Parameter
Parameter Name | How to find its value? | |
DLT_TE_ID | Numeric Value (This DLT Template Id can be found from your DLT platform) | |
dev_mode | 1 (This is used for DLT Testing purposes) When you pass this additional parameter, the SMS will be delivered via DLT scenario. |
Sample Encoded API URLs:
If you are using Sendhttp API, pass DLT_TE_ID parameter in your API base URL

If you are using the V2 API, pass DLT_TE_ID parameter as below:
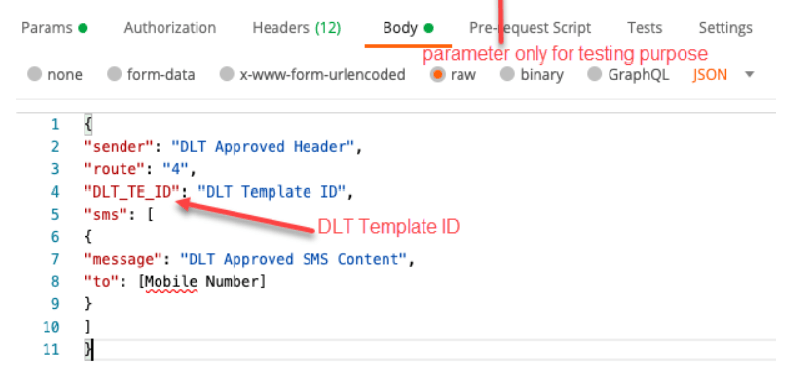
If you are using Old SendOTP API, pass DLT_TE_ID parameter as below:

Testing of SMS Content Template in DLT scenario:
1. Send an SMS bypassing DLT_TE_ID and dev_mode=1 on your mobile number
2. Now, check your phone for this SMS; if you have received this SMS, that means that this Template, Header, and Template Id combination will work in the right way once the DLT Template is LIVE.
3. If you have not received this SMS, login to the C2SMS panel, go to the logs section, and search for this particular number. You will be able to see the exact reason for failure when you bring the cursor on the red failure sign.
4. Based on the failure reason, correct your mistake and try again.
Notes:
a) Do not pass dev_mode=1 on LIVE traffic, this is just for testing purposes.
b) Kindly start passing your DLT Template Id in your APIs today itself, so you don’t have to make any changes on the Go-LIVE date!
As per new DLT guidelines, Registration/Entity/PE Id will be a mandatory SMS parameter. From 19th November 2020, SMS will not be delivered in absence of PE (Entity) Id.
We have come up with an option to add Registration/Entity/PE Id on your SMS panel itself and does not need your developer’s intervention.
So, we recommend you to add the Registration/Entity/PE Id immediately, just a simple 2 min task
Kindly login to your registered DLT platform and copy your Registration/Entity/PE Id –
http://9m.io/6mol/
Then, log in to your SMS panel and map each of your Header (Sender Id) with your unique 19 digit DLT Registration/Entity/PE Id, issued by the Telecom Operator upon DLT registration.
1. To Edit existing Header (Sender Id)
Kindly login to your SMS panel and go to settings section >> Sender Id >> Action >> Add your Registration/Entity/PE Id against each of your Header (Sender Id).
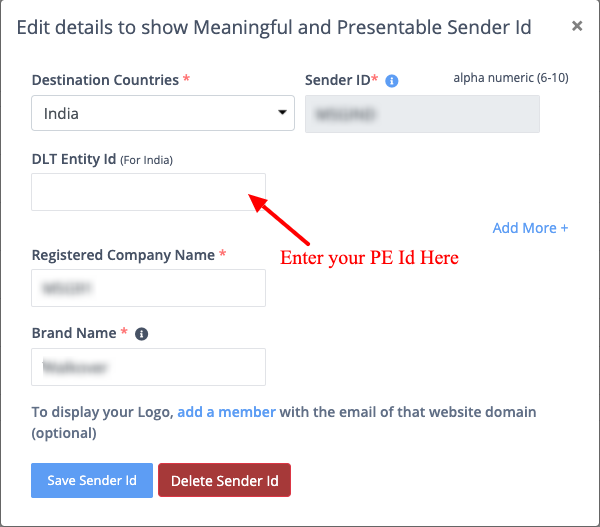
2. To add a new Header (Sender Id)
Kindly login to your SMS panel and go to settings section >> Add Sender Id >> Select Country >> Add Registration/Entity/PE Id (in case you want to send SMS to India) >> Add DLT approved Sender Id >> Click on Submit.
Note- If you are a Reseller, kindly share this Whitelabel Link with your clients-
http://9m.io/6mrg/
PS– If you have still not registered on DLT, kindly register now, else your SMS will not be delivered. Check this process doc- http://9m.io/5syi/
As per the rules of Telecom Regulatory Authority of India (TRAI), OPT-OUT SMS is sent to every DND number so that the user can unsubscribe receiving SMS from a particular sender ID.
Every country has its own strict rules and, according to the rules in India, we send this SMS on your behalf. This SMS differs on the basis of every country’s rules.
How the receiver can unsubscribe: If the user will go through the link provided, then s/he will be able to confirm her/his choice of opting out and if s/he wishes then s/he can also give a missed call to the number provided in the same message. Both methods will result in blocking the number for future messaging.
Why is OPT-OUT important: This SMS is an additional security to avoid the risk of complaints. If you are unable to provide proper registration details, you will be charged Rs. 25,000 for every complaint.
Note: This SMS will be sent every 3 months for a particular Sender ID.
The following are the listed differences between Transactional and Promotional routes:
| Transactional | Promotional |
| 1. These can be used for sending any type of information. Ex. Order updates, Bank Transactions etc. | 1. These are specifically used for marketing purposes. Ex. Sale, Offers etc. |
| 2. Transactional SMS can be sent any time | 2. Promotional SMS are sent between 9 AM to 9 PM only |
| 3. SMS can be sent on DND numbers | 3. SMS cannot be sent on DND numbers |
| 4. In API route=4 | 4. In API route=1 |
The route is for SendOTP. if you are looking for OTP services, we would suggest you opt for SendOTP because it has various advantages over the traditional transactional route:
A request ID is a unique 24 character alpha-numeric ID which lets us get the full report of the SMS submitted by the user.
You can find the request ID of any specific message in the Log section by moving your cursor on the log.
A typical request ID looks like, 558255015263edec108b459
Absent subscriber: Absent subscriber due to the phone being switched off, due to phone out of coverage, due to roaming restriction/restricted area.
Absent subscriber (HLR Access Denied: Postponed): Subscriber cannot be reached at the time of broadcast or unknown subscriber. The Home Location Register is a database. It provides routing information for MT (Mobile Terminated) calls and SMS (Short Message Service) Absent subscriber (No acknowledgment): Absent subscriber due to the phone being switched off, due to phone out of coverage, due to roaming restriction/restricted area without acknowledgment.
Absent subscriber (Destination resource shortage): The message is rejected because there was no paging response, the IMSI record is marked detached, or the MS is subject to roaming restrictions.
Absent subscriber (SMS delivery postponed): User’s mobile number not reachable or out of network coverage area.
Absent subscriber (Destination out of service): Mobile number barred at the carrier end.
Absent subscriber SM: Out of coverage area (or) switched off. The error might be due to the poor network coverage area and the same flag was updated in the HLR.
Note: Important Abbreviations:
| MT | Mobile Terminating | CUG | Closed User Group |
| MS | Mobile Subscriber | HLR | Home Location Register |
| SRI | Send Routing Information | VLR | Visitor Location Register |
| FSM | Forward Short Message | PDU | Protocol Data Unit |
| SGSN | Serving GPRS Support Node |
Reports
1. Login in to your C2sms account, select SendOTP on the left-hand sidebar.
2. Go to the Reports tab.
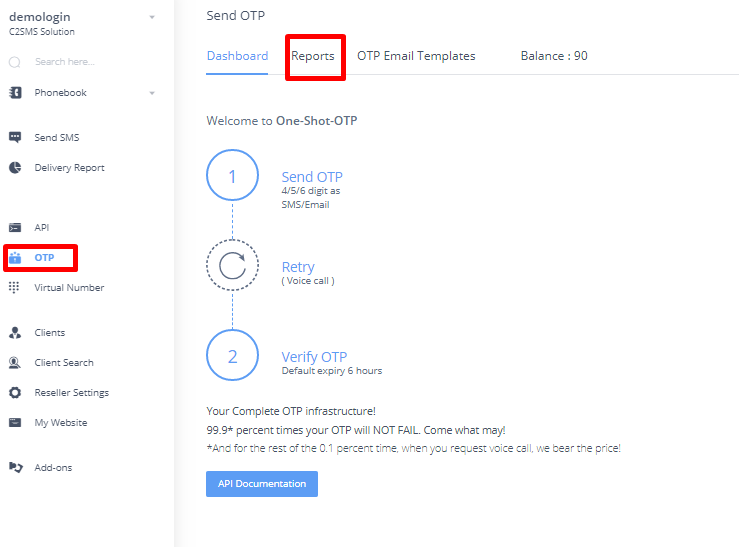
3. Here you get to see all the reports, you can also search using ‘Mobile number’. You can also check if a number has been verified or if a retry attempt has been made.
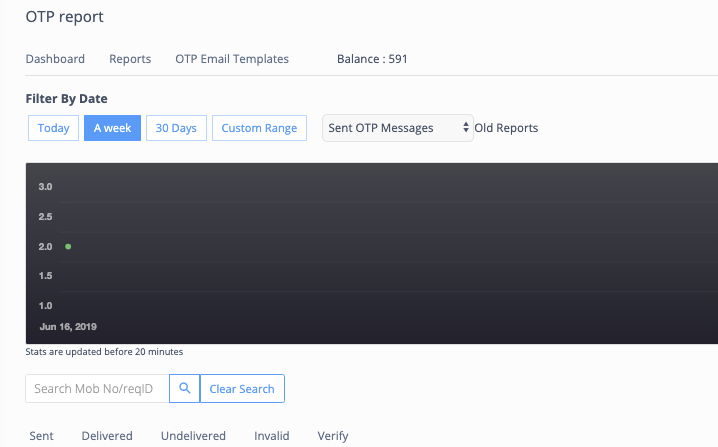
Different colors in status have different meanings :
Red: Failed
Blue: Delivered
Yellow: Pending
Grey: Retry
Green: Verified
Note: Messages which are pending for more than 15 minutes are logged, else the entry is made only when the message is finally updated as delivered or failed
There are two processes. You can choose either,
1. OTP verification at SendOTP server
Once you call the OTP API we generate OTP and save it in the secured database for defined seconds and then send the SMS to the user. If the user does not receive the SMS, they can ask for resending.
Once you call the same API with the same mobile number, we automatically generate voice call and read OTP.
2. OTP verification on your server
In this process, once you call the OTP API from your server, we give you OTP in response and you can save it on your server. You can use it for the verification process on your server only.
Both the processes are secure from our end, but process number 2 is dependent on your security protocols.
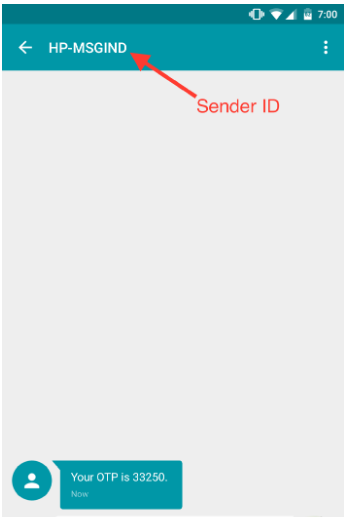
Sender ID
Sender ID is a set of characters that represent the identity of a sender. For example, when you receive a regular SMS from a friend, her/his name (as stored in your contacts) is displayed as a Sender. Similarly, when a business sends an SMS to its customers, a numeric or alphabetic set of characters represents the company or brand name.
Sender ID for Promotional SMS is numeric and is decided by the operator. For example 777777
Sender ID for Transactional SMS is 6 alphabetic characters in India. For example: NOTIFY, MSGIND. For other countries, sender ID format may vary according to the rules of a particular country.
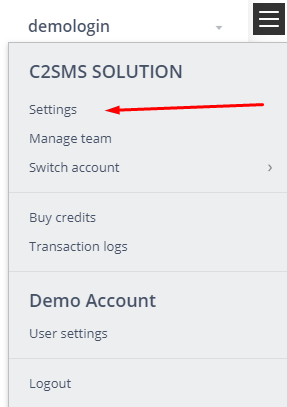
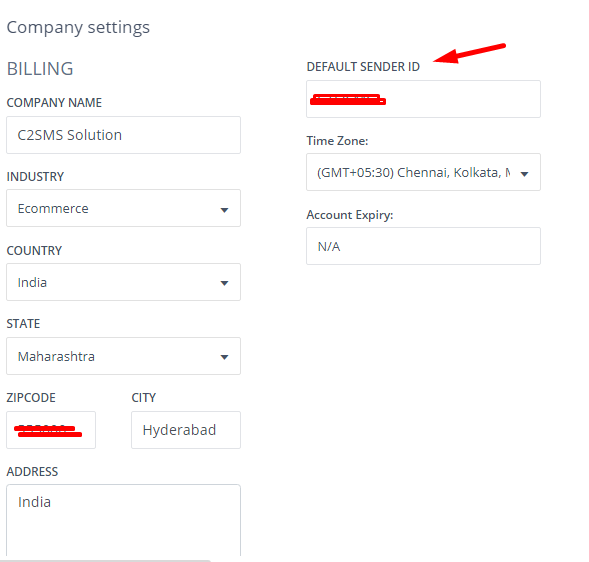
You may set your default sender ID by following the steps mentioned below:
1. Go to settings:
2. Enter your sender ID in the box of default sender ID and update it.
Create a website for selling SMS
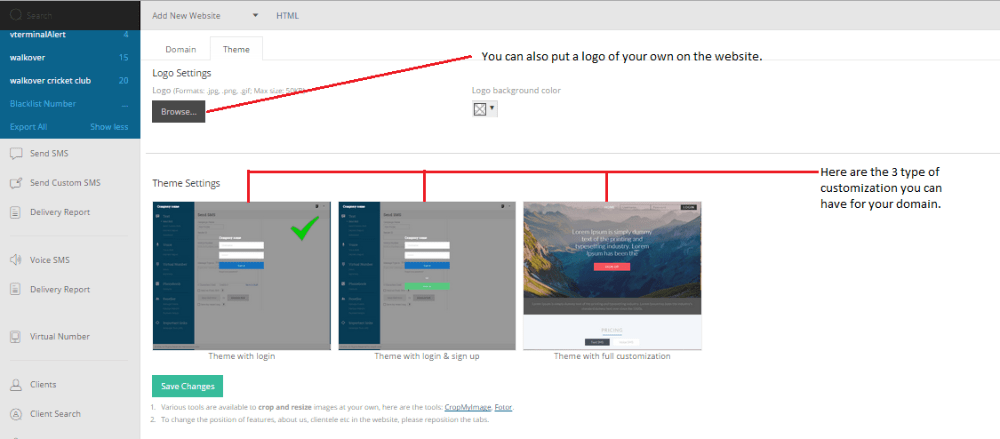
You can white-label your domain/sub-domain and customize your website as per the themes available.
How To Design
1. Go to the My website option available at the bottom section of the sidebar. (Refer screenshot)
2. Add the domain name of your choice in the field.
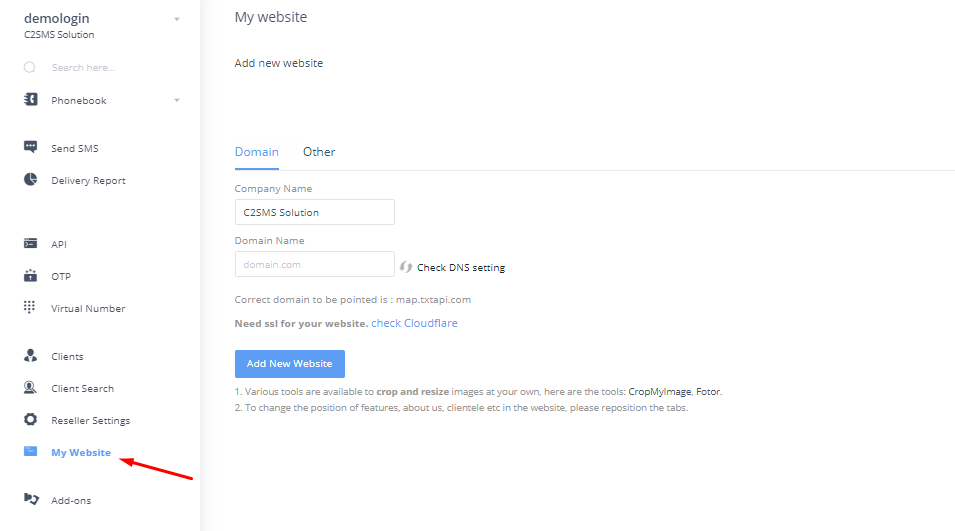
3. Select a theme of your choice from the available options.
4. You can also add a logo of your website if you wish to.
You can white-label your website by pointing CNAME to our domain. You can point CNAME on your domain/subdomain with our domain “map.txtapi.com” by following these steps:
1. Sign in to your domain’s account at your domain host. Who is my domain host?
2. Locate the page for updating your domain’s DNS records.
The page might be called something like DNS Management, Name Server Management, or Advanced Settings.
3. Locate the CNAME records for your domain. You may already have one or more records resembling:
Name / Time to Live Record Value / Answer /
Host / Alias (TTL) Type Destination
www 86400 CNAME yourdomain.com. or @
mail 86400 CNAME yourdomain.com. or @
4. Add a CNAME record with the correct values for your desired use case. Or modify an existing CNAME record if the one you want to change is already there. To find out exactly what values to enter, see CNAME record values.
5. Save your changes and wait until they take effect.
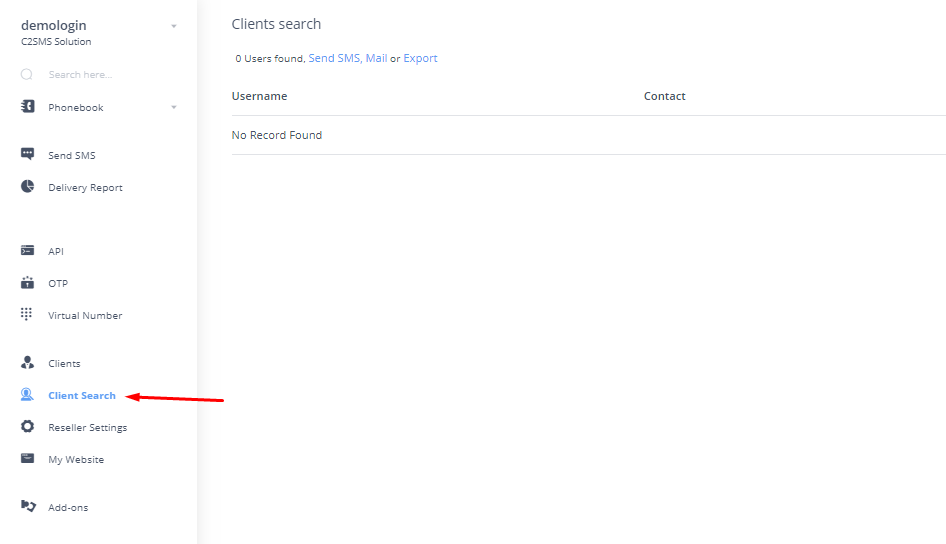
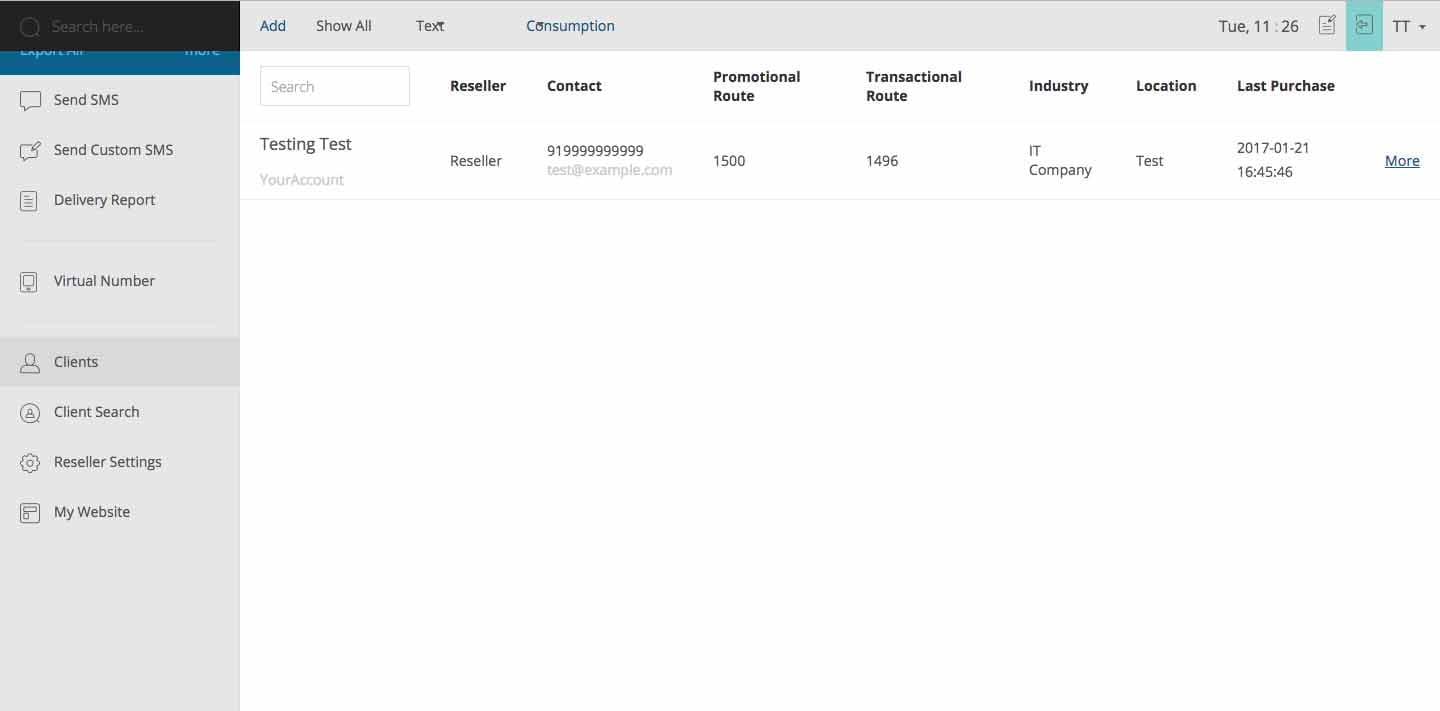
The client Search option lets the re-seller get the information about all his clients.
Following steps and screenshots will help you use Client Work:
1. Find and click the option of Client Search which is available in the options menu. (Refer screenshot)
2. Among the list of various filter options on the right side of your screen, select the ones appropriate for your need and then click on the search button.
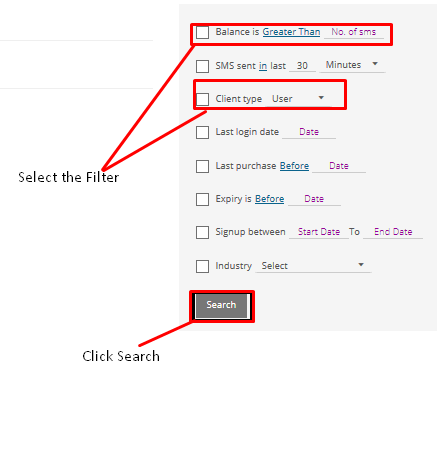
3. The results will be displayed according to your entries.
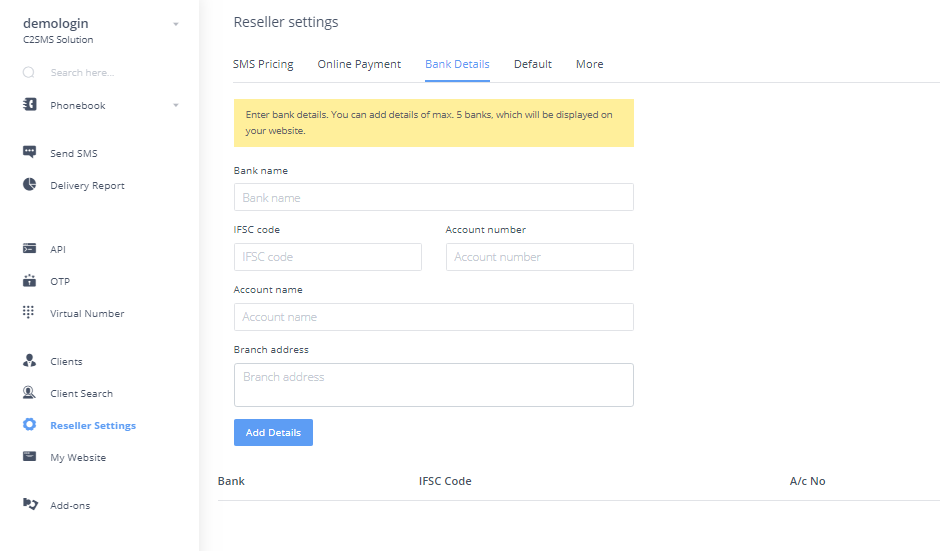
Follow the steps to add Bank details to your website:
1. Go to re-seller settings.
2. Click on Bank details
3. Fill in all the details of the bank and Add Details. You can also add details of multiple banks.
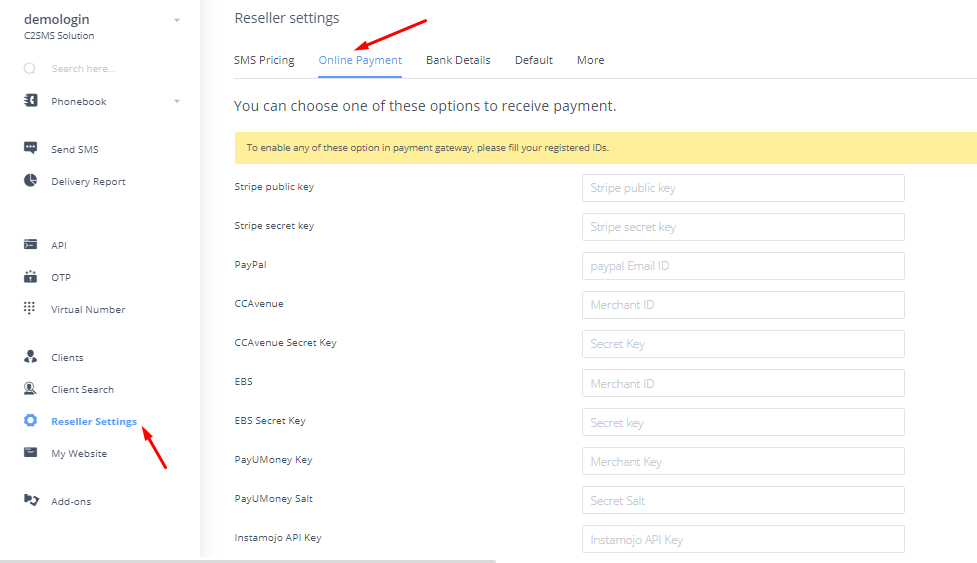
Yes, your client can also pay you online if you integrate your payment gateway in our reseller panel.
1. Go to Reseller Settings.
2. Choose online payment details and fill in your details to enable online payment
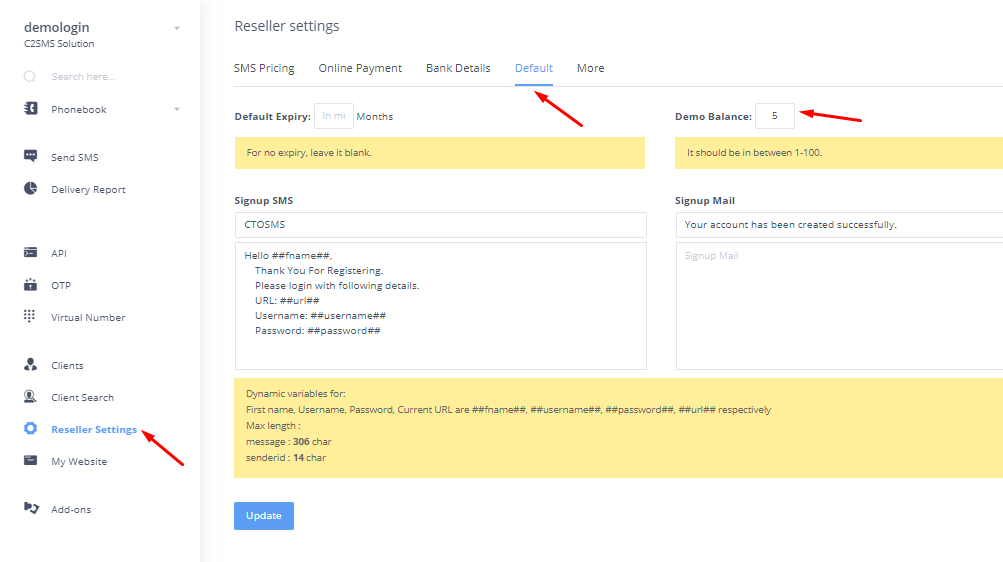
To set the demo balance for your clients work through the flow given below:
1. Go to the reseller setting.
2. Choose Default settings.
3. Set the demo balance
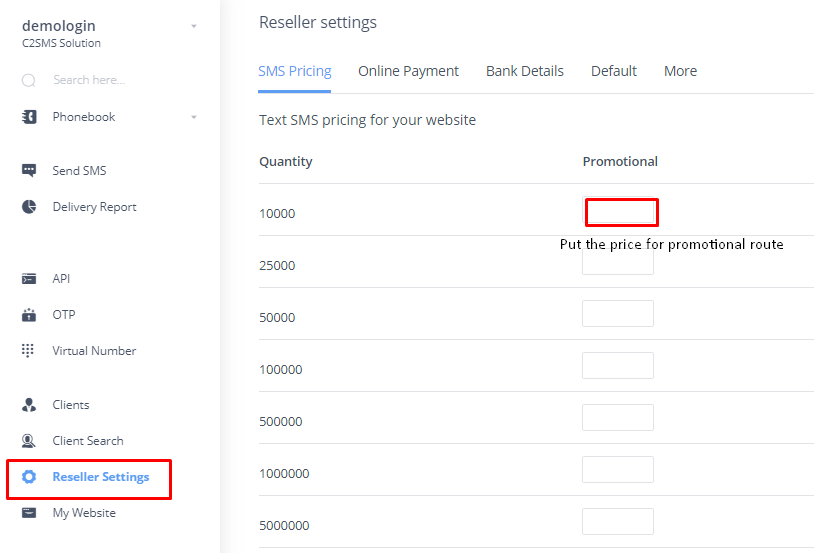
ADD PRICE
You can follow the following steps:
1. Go to Reseller setting option.
2. Click on SMS Pricing in the menu bar.
3. Add your desired pricing in the fields.
If you wish to disable any client, kindly follow the steps written below:
Disable your client by clicking on the option of disable.
Here are the steps to be followed to add new client:
1. Click on Clients
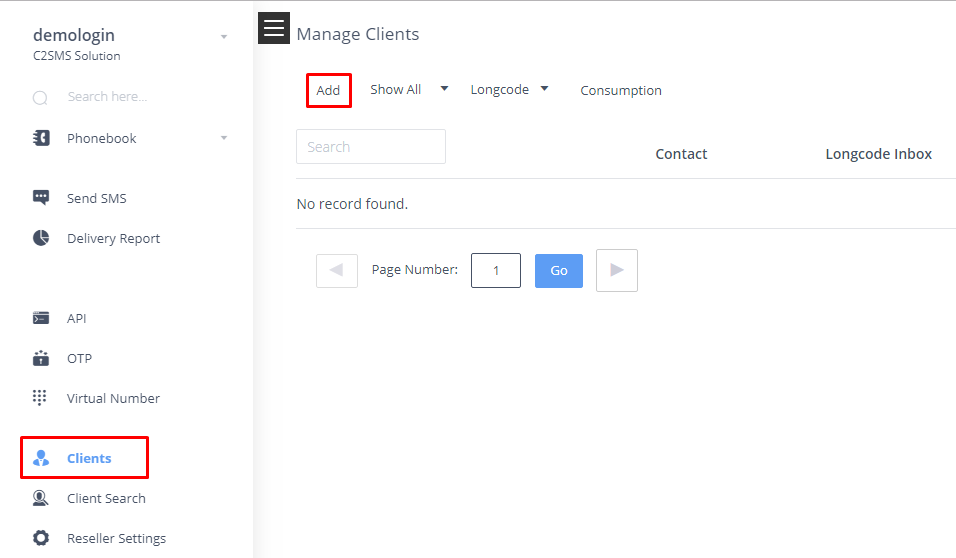
2. Select ADD to fill in the details of the client
3. After filling in all the details, click on ADD to add the client.

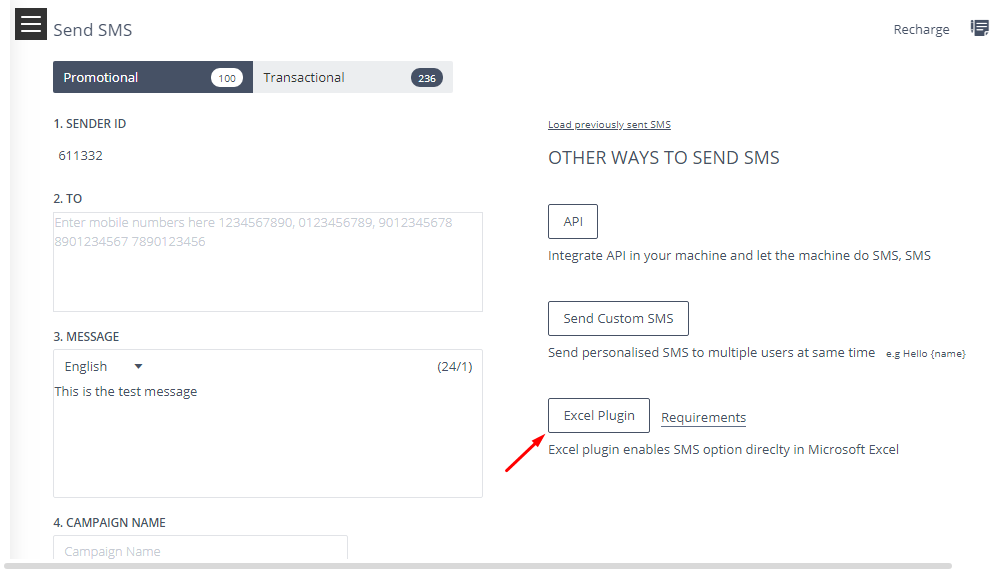
Excel Plugin empowers you to send SMS directly from the excel sheet. You do not need to upload your excel sheet on the panel. You are allowed to send SMS from the sheet itself without going online.
Just follow the below-mentioned steps:
1. From the panel, you need to download the Excel Plugin. You can find the download option on the ‘Send SMS’ page.
2. Look for all the requirements to be met, so as to use the Excel Plugin:
3. Install the downloaded file and you will be able to find an option of C2sms- SMS Plugin in your Excel. For login, use your company username and password.
4. Complete the entries to be filled in the sheet and click on Send SMS. Then the complete procedure is the same as the panel.
You need to close all the sheets opened at your end and then clear your cache memory.
1. Click Wrench icon (at the top right of the browser)..>Select the option Tools..>Click ‘Clear Browsing Data’..>Mark ‘Empty the cache’ option..>Click the button ‘Clear Browsing Data’
2. The keyboard shortcut is Shift+Ctrl+Delete.
Once you have done the same, please open a single sheet and then try to send the messages.
Magento is an E-commerce platform built on open source technology which provides online merchants with a flexible shopping cart system, as well as control over the look, content, and functionality of their online store. C2sms Magento SMS extension is an SMS plugin which can be utilized to send SMS to customers. Whether it is about placing orders or dispatching them, now the users will receive every detail on their mobile phone.
For Magento 1: https://meetanshi.com/magento-sms-notification.html
For Magento 2: https://meetanshi.com/magento-2-sms-notification.html?utm_source=m1sms&utm_medium=switch
In order to make a refund request, you can directly write to our support team.
Your amount will be refunded within 7-10 working days.
The charges of any message depend on the number of credits consumed, the pricing per credit according to the country to which you are sending the message. You can see the price per credits on our pricing page.
Also, failed messages are charged but NDNC and Blacklisted numbers are not charged.
Credits are the number of SMS you currently have in your account. When you send an SMS, your credits get deducted accordingly. Credit Deduction refers to the number of credits deducted from your balance for sending the message.
When you send an SMS in English the credit limit is 150-160 characters whereas in the Unicode option i.e. when you send SMS in other languages, the limit is 55-70 characters.
In case, of transactional messaging, an OPT-OUT SMS is sent to the DND numbers for which an extra credit is deducted.
You will be able to see the credits consumed by your content on the top right corner of the Text box.
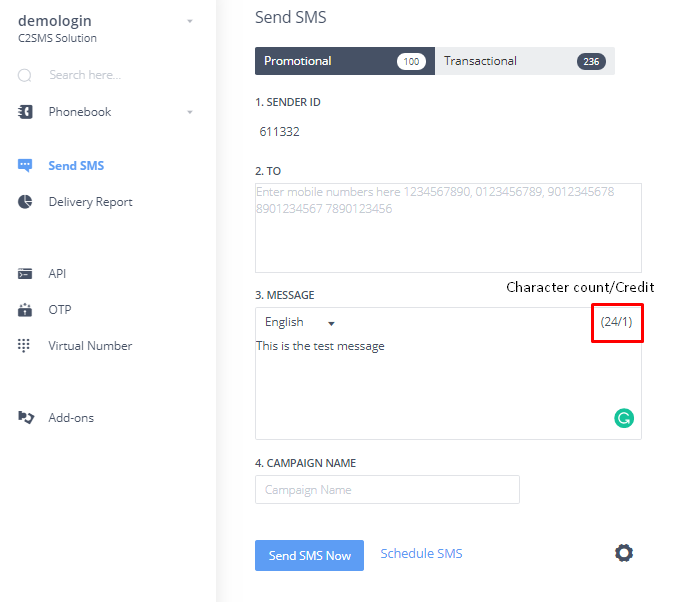
The value for a single credit in English is 160 characters. With the number of characters increasing, the second credit consists of 306 characters and moving on in this manner the value of credit deduction increases by adding 153 characters in the SMS every time. As the number of characters keeps on increasing the number of credits deducted will also increase according to that.
For Unicode the credit calculation as below:
You can see the number of credits as well as a deduction in the delivery report of your SMS.
Yes, you can export the reports of a particular keyword from the panel by following the steps written below:
1. Click on the option of Virtual Number.
2. In the inbox tab, fill the details in the fields available. (Select the desired keyword, long code and date for which you want the reports.)
3. Click on the option of Export them and the report will be sent to your e-mail ID.
You can send a personalized SMS to all the numbers who send an SMS to your Longcode number.
1. You need to put in a callback URL in our webhook on which we will push the data of the SMS received from the client.
2. You can fetch the data and store it from that URL and integrate an API to customize your SMS according to the SMS received.
To add a new keyword, follow the below-mentioned steps:
1. Go to the Virtual Number option.
2. Select the option of Keyword.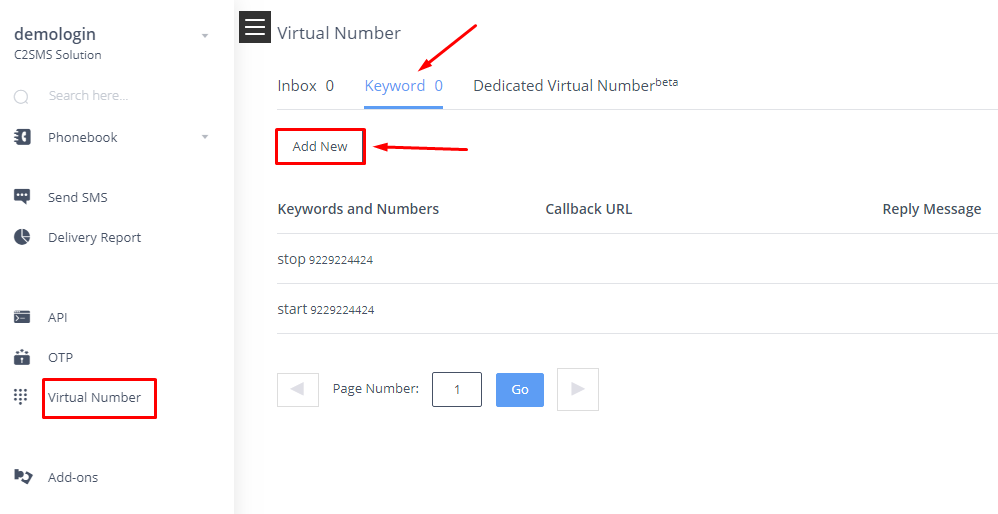
3. Click on the ADD button and enter the keyword of your choice.
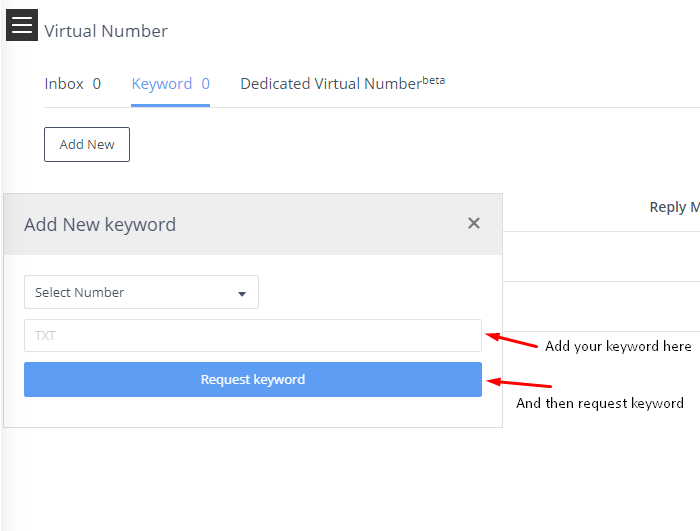
4. Send it for approval and we’ll let you know if this keyword is available.
NOTE: The maximum character limit for a keyword is 20.
Shared Long-Code is the common number for a group of people. For C2sms the shared Long-Code is 9229224424. Using this number will be free of cost, you will be charged only for the incoming SMS. Incoming SMS is differentiated by keyword, and hence your keyword must be unique.
Dedicated Long -Code will be 10 digits mobile number of your choice. There will be a one-time set-up cost for the new mobile number. The keyword can be of your choice as the incoming SMS is differentiated by the mobile number in this case.
When someone sends an SMS on your keyword and you aren’t receiving it, there can be three main reasons behind this situation:
You can contact our support team for the same.
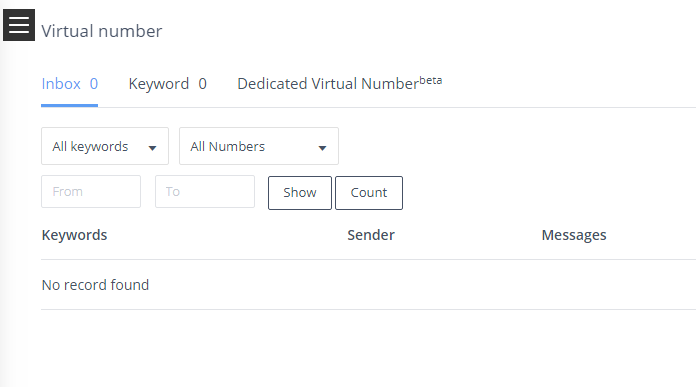
1. Virtual Number:
Virtual Number is a 10 Digit Mobile Number (sometimes also called as Longcode Number) to which your clients or members can send an SMS starting with a keyword.
You will be able to receive the messages in your C2sms inbox, on your email and also on your callback URL. You will also be able to set an auto-reply SMS to all the numbers from which you have received responses. Now if you want to send the reply SMS after some calculation on the text received from your client, you will need to integrate the SMS API in your software which will shoot your SMS after the calculation.
For eg. in Kaun Banega Crorepati, you are supposed to send an SMS to 56565 with KBC A/B/C/D
2. Keyword:
If someone sends an SMS starting with your keyword, you will be able to receive the messages in your C2sms inbox, on your email or also on your callback URL. So KBC is the keyword. You can choose any keyword for yourself.
You can also set an automatic reply for the SMS you receive.
A keyword of 6 or more than 6 characters would be free of cost. Other than that the pricing would be as follows:
5 Character: 1,000 Rupees
4 Character : 2,000 Rupees
3 Character : 3,000 Rupees
2 Character : 4,000 Rupees
1 Character : 5,000 Rupees
3. Inbox Balance:
That is the number of SMS you can receive in your Inbox. You need to purchase the inbox balance so as to receive the SMS your customer is sending to you.
SendOTP is an integrated platform of C2sms through which you can easily integrate 2-factor authentication/mobile verification service in your application to generate, send and verify one time passwords for ‘n’ number of users, never letting your end-user go.
SendOTP maintains the database for the sent OTPs and they can be easily filtered. It reduces a significant amount of coding on the application part making it lighter.
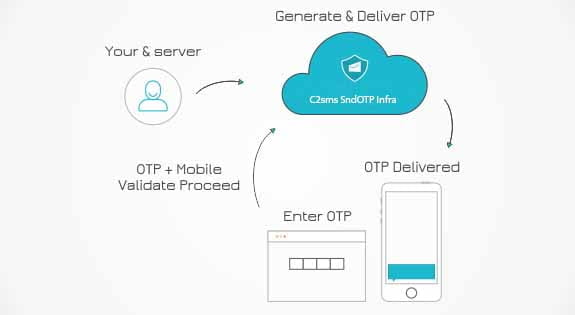
With SendOTP all a user needs to do is:
1. Verify the phone number
2. Enter the verification code
The user is verified in just two steps and all it takes is 120 seconds.
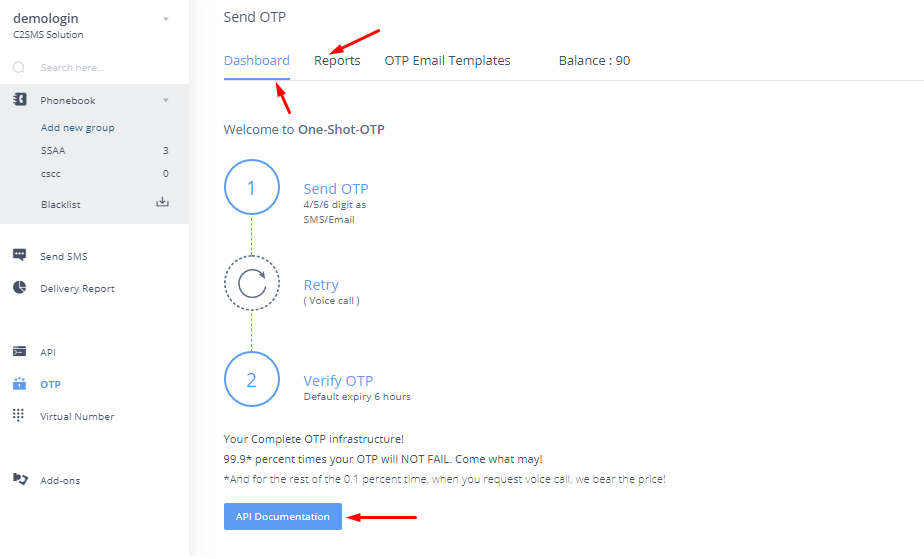
Here are the details to use SendOTP APIs:
1. Click on SendOTP at the left-hand sidebar.
2. You can check the details on Reports page and for API documentation click on the button below:
For other queries, contact Support at [email protected]
Keep messaging!
SendOTP is a ‘one-time password’ (generating, delivering and verifying) mechanism. Copy pasting a couple of codes allow you to integrate the 2-factor authentication facility. Once this is done, then we generate, deliver and verify one-time password of your clients.
SendOTP is a flagship product of C2sms.
SendOTP offers you high-quality premium services that let you save on:
P.S. SendOTP uses the integrated services of C2sms.
You can choose Group option to send SMS in bulk. The Send SMS on Group feature saves your time, just save your group once with the numbers of data and you can use it anytime to send the bulk SMS.
1. Select “Send SMS” on the panel.
2. Select/Enter the Sender ID through which you want to send the SMS.
3. Click on the mobile number field and all created group in phonebook appears at the right-hand side of the screen, you can select group to send SMS.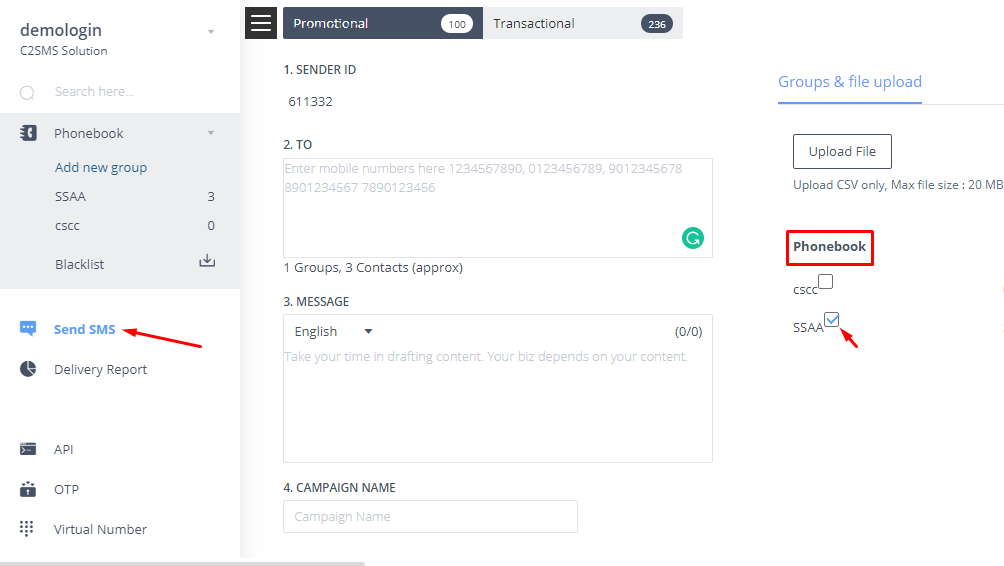
4. Type in the content of the SMS you wish to send.
5. Select the name of the campaign (optional), and click on Send.
EXPIRY DATE OF NUMBER
1. Select the group.
2. Click on the Edit option besides the contact.
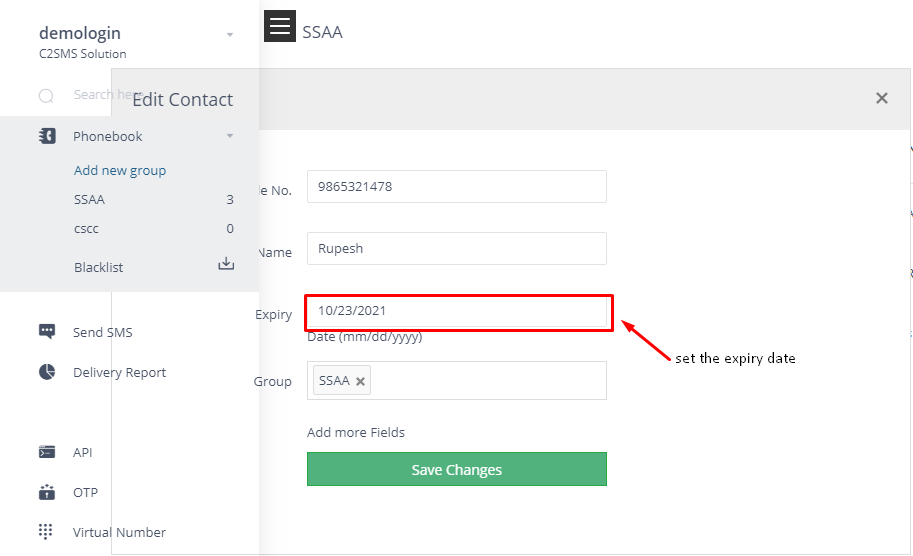
3. Set the expiry date of your choice in the field and save changes.
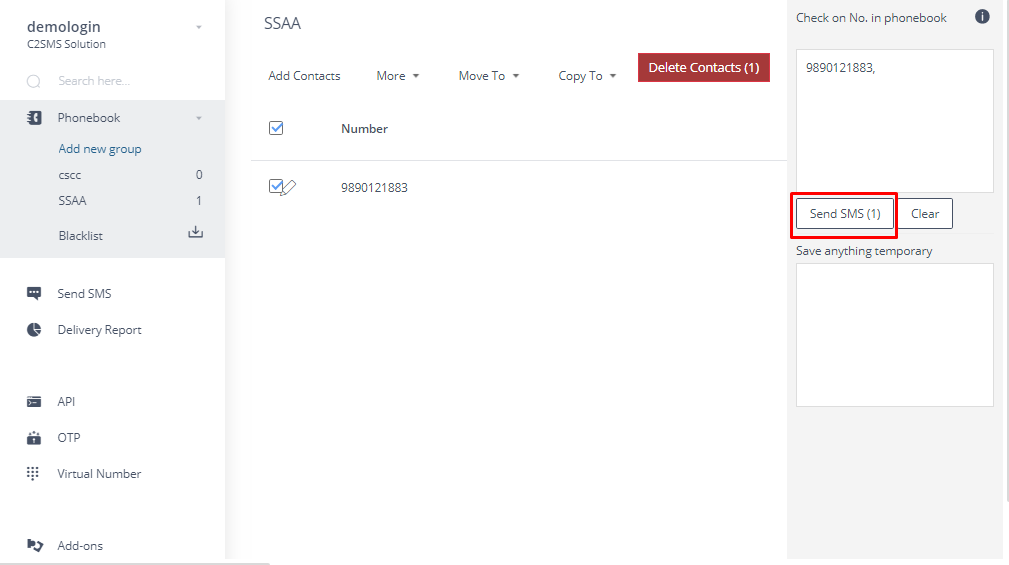
To send SMS to selected numbers you need to follow these steps:
1. Select any group from which you wish to choose numbers.
2. When you get the list of contacts, check the box beside them to send an SMS on them.
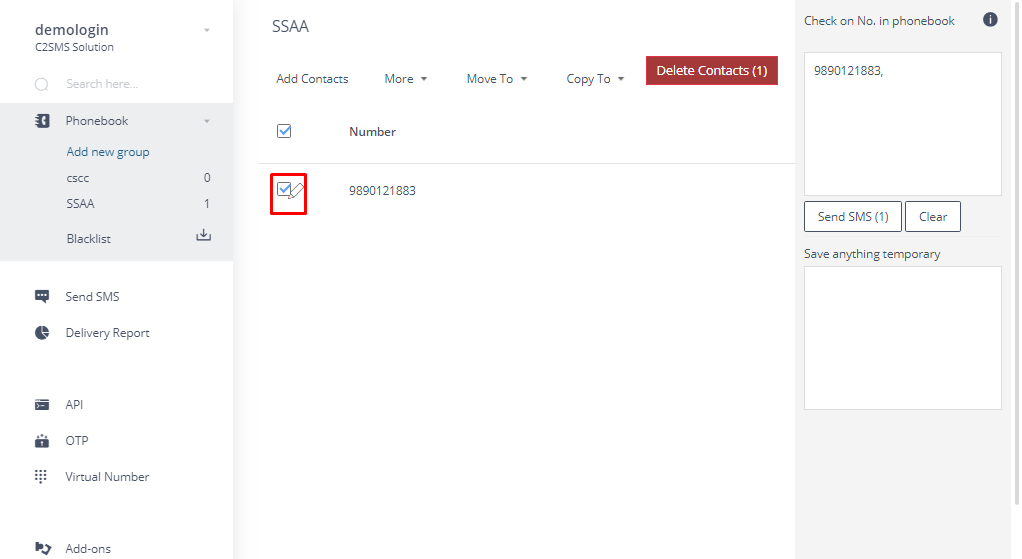
3. Click on the option of Send SMS on the right side of the screen.
4. All your selected numbers will be displayed and you can type and send your SMS on those.
Go through the following steps to add a group:
1. Click on the Add group option in the top left corner.
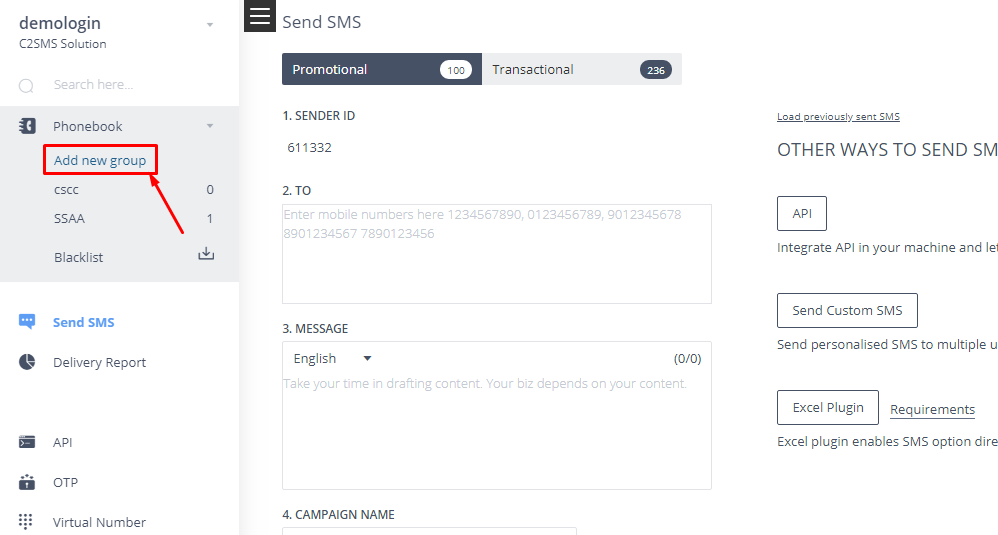
2. Type the group name you wish to choose and press ENTER.
3. You may add contacts individually by filling in the details or by directly importing a CSV file of your stored contacts.
Also, there is no limit on importing contacts. You may import any number of contacts in one go.
NOTE: The only restriction is that the file size should be limited to 32MB.
![]()
C2SMS is among leaders in Cloud Communications Services. We are presently hosted various cloud based services, Bulk SMS, API, Cloud Telephony